Battery switch on travel trailer function is crucial for managing your RV’s power. Understanding how your battery switch works is key to preventing electrical problems and maximizing your battery life. This guide covers different switch types, wiring, safe operation, troubleshooting, and best practices for keeping your travel trailer’s power system running smoothly. We’ll explore how the battery switch interacts with shore power and a generator, ensuring you’re prepared for any situation on the road.
From connecting and disconnecting batteries safely to identifying and fixing common issues, we’ll provide clear instructions and helpful tips to keep your RV’s electrical system functioning optimally. We’ll also delve into power management strategies and essential safety precautions to ensure a worry-free camping experience.
Understanding Battery Switch Functionality in Travel Trailers
Your travel trailer’s battery switch is a crucial component, acting as the central control for your trailer’s battery power. It allows you to easily disconnect or connect your house batteries, preventing unwanted drain and providing a safe way to work on your electrical system. Understanding its function and operation is essential for maintaining your RV and avoiding potential problems.Battery switches in travel trailers serve the primary purpose of isolating the house batteries from the rest of the trailer’s electrical system.
This isolation is critical for several reasons: it prevents the house batteries from draining completely when the trailer is not in use, it protects against accidental short circuits while working on the electrical system, and it allows you to choose which power source (shore power or battery power) is supplying the trailer’s appliances.
Types of Battery Switches
Travel trailers typically utilize one of several types of battery switches, each designed to manage different battery configurations. A single battery switch controls a single battery bank, while a dual battery switch manages two separate battery banks. Some more complex systems might incorporate a battery disconnect switch combined with a selector switch. The selector switch allows you to choose between using shore power, battery power, or both simultaneously (if the system is wired to allow it).
The disconnect switch provides a complete cut-off of power to the batteries. Finally, some modern RVs utilize sophisticated electronic battery management systems that offer more control and monitoring capabilities than simple switches.
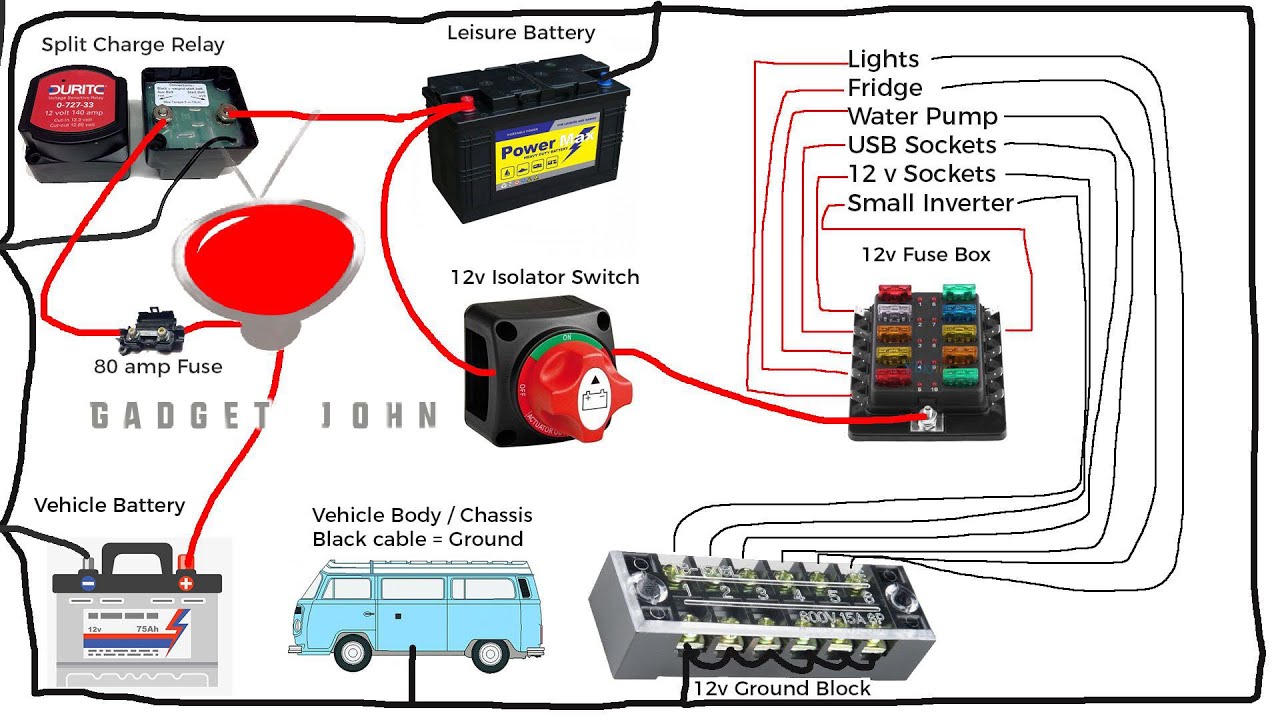
Typical Wiring Configuration
The wiring of a battery switch system is relatively straightforward. The positive (+) cable from the battery connects to the battery switch. From the switch, a positive cable runs to the trailer’s distribution panel. The negative (-) cable from the battery usually connects directly to the trailer’s chassis, providing a ground. A dual battery switch will have separate positive cables for each battery bank, and both will connect to the same distribution panel.
Important note: The negative cables from each battery should be connected to a common ground point to ensure proper functionality. Improper grounding can lead to electrical problems.
Operating a Battery Switch
Operating a battery switch is generally simple but requires careful attention. Before operating the switch, ensure you understand its position markings. Common positions include “Off,” “Battery,” “Both” (if applicable), and “Shore Power.” Here’s a step-by-step guide:
1. Identify the Switch
So, you’re an audiophile who loves to travel? Awesome! Make sure you check out this guide on audiophile travel setups before you go – it’ll help you keep your tunes sounding amazing on the road. And speaking of travel, don’t forget to sort out your insurance! Getting Aon travel insurance is a smart move for peace of mind, especially if you’re carrying expensive audio gear.
Planning is key to a smooth and enjoyable trip, so get those details sorted early!
Locate the battery switch, usually found near the batteries or inside a convenient access panel.
2. Understand the Positions
Familiarize yourself with the switch’s markings to understand what each position does.
3. Turn the Switch Off
Begin by turning the switch to the “Off” position. This completely disconnects the batteries from the trailer’s electrical system.
4. Perform Maintenance or Repairs (If Necessary)
If you are performing maintenance or repairs, this is the safest position to be in.
5. Select the Desired Power Source
Once finished, turn the switch to the desired position: “Battery” to use battery power, “Shore Power” to use shore power, or “Both” (if available) to use both simultaneously. Ensure that you’ve connected your shore power cord correctly before switching to the “Shore Power” position.
6. Verify Power
After switching positions, check the operation of your trailer’s appliances to ensure power is being delivered correctly.
Connecting and Disconnecting Batteries
Properly connecting and disconnecting your travel trailer’s batteries is crucial for safety and to ensure the longevity of your electrical system. Incorrect procedures can lead to sparks, damage to your battery, or even injury. This section details the correct methods and best practices for maintaining your battery connections.Connecting a battery to your travel trailer’s electrical system involves a few simple, yet important steps.
First, ensure the battery switch is in the “OFF” position. This prevents accidental short circuits. Next, carefully connect the positive (+) cable to the positive terminal of the battery and the trailer’s positive terminal, making sure the connection is secure and tight. Repeat this process for the negative (-) cable, connecting it to the negative terminal of the battery and the trailer’s negative terminal.
Always connect the positive cable first and disconnect the negative cable last to avoid accidental shorting.
Battery Disconnection Procedure
Disconnecting your batteries is equally important, especially before long-term storage. Begin by ensuring the battery switch is in the “OFF” position. Then, carefully disconnect the negative (-) cable from the battery and the trailer’s negative terminal. Afterward, disconnect the positive (+) cable. This order prevents accidental sparks that could occur if the negative cable is disconnected first.
Remember to always handle the cables with care to avoid damage to the insulation.
Maintaining Battery Connections
Regular maintenance of your battery connections is vital to prevent corrosion and ensure optimal performance. Corrosion can build up over time, creating resistance and reducing the effectiveness of your electrical system. To prevent this, apply a thin layer of dielectric grease to the battery terminals and cable clamps before connecting them. This grease acts as a barrier, preventing moisture and corrosion.
Periodically inspect the connections for corrosion and clean them with a wire brush if necessary. After cleaning, reapply dielectric grease.
Battery Connection Inspection Checklist
Before each trip, a quick inspection can prevent unexpected problems. Here’s a checklist to follow:
- Battery Switch: Verify the switch is in the “OFF” position before making any connections.
- Cable Connections: Inspect all cable connections for tightness and signs of corrosion. Tighten any loose connections.
- Terminal Cleanliness: Check the battery terminals for corrosion. Clean and apply dielectric grease if necessary.
- Cable Condition: Examine the cables for any damage, such as fraying or exposed wires. Replace damaged cables immediately.
- Battery Level: Check the battery voltage to ensure sufficient charge.
After each trip, repeat the inspection process. This routine maintenance will ensure your battery system remains reliable and safe for your next adventure. Remember, proactive maintenance is far easier than troubleshooting problems on the road.
Troubleshooting Common Battery Switch Issues
Dealing with a malfunctioning battery switch in your travel trailer can be frustrating, leaving you without power when you need it most. This section will guide you through identifying and resolving common problems, helping you get back on the road quickly. Remember safety first – always disconnect power before working on any electrical components.
Battery switch problems often manifest as a complete lack of power to your trailer’s appliances or a partial power outage. Sometimes, the problem is simple, like a blown fuse. Other times, it could indicate a more serious issue with the switch itself or the wiring. Understanding the symptoms and troubleshooting steps is crucial for efficient repairs.
Identifying Common Battery Switch Problems
Common problems include a completely dead system (no power to anything), partial power loss (some things work, others don’t), inconsistent power (intermittent power fluctuations), and blown fuses (repeatedly blowing fuses in the battery switch circuit). These problems often stem from loose connections, corroded terminals, faulty wiring, or a failing battery switch itself. A thorough inspection is the first step.
Troubleshooting Steps for a Non-Functional Battery Switch
Troubleshooting a non-working battery switch involves a systematic approach. Start with the simplest checks and move to more complex solutions only if necessary. This organized approach helps to pinpoint the exact cause of the problem efficiently.
| Step | Action | Possible Cause | Solution |
|---|---|---|---|
| 1 | Check the fuses. | Blown fuse(s) in the battery switch circuit. | Replace any blown fuses with fuses of the correct amperage. If fuses blow repeatedly, there’s a short circuit that needs to be addressed. |
| 2 | Inspect the battery switch itself. | Loose connections, corroded terminals, or a faulty switch. | Tighten any loose connections. Clean corroded terminals with a wire brush and baking soda solution. If the switch itself seems faulty, replacement is necessary. |
| 3 | Examine the wiring. | Broken or damaged wires, loose connections. | Carefully inspect all wiring connected to the battery switch. Repair or replace any damaged wires. Secure any loose connections. |
| 4 | Test the batteries. | Dead or low battery voltage. | Test the voltage of each battery using a multimeter. If the voltage is low, charge the batteries or replace them if necessary. |
Addressing Common Battery Switch Malfunctions
Once you’ve identified the problem, the solution is usually straightforward. Replacing blown fuses is a quick fix. Cleaning corroded terminals often restores power. Repairing or replacing damaged wiring requires more skill but is still manageable for those with basic electrical knowledge. Replacing a faulty battery switch might require more technical expertise or professional help, depending on the type of switch and its installation.
Always consult your trailer’s wiring diagram for guidance. Remember to disconnect the power before working on any electrical components.
Battery Switch and its Role in Power Management

The battery switch is the central control point for your travel trailer’s electrical system, acting as a gatekeeper for power flow between your house batteries and the various appliances and systems within your RV. Understanding its function is key to efficient power management and extending the life of your batteries. It allows you to isolate the batteries for maintenance or prevent accidental drain, and selectively power different parts of your RV.The battery switch’s primary role is to route power from your batteries to the 12-volt DC systems in your travel trailer.
This includes lights, water pumps, fans, and other appliances. It also often plays a role in charging your batteries from either your alternator or shore power. By strategically using the switch, you can control which circuits are active and conserve battery power when not needed.
So, you’re an audiophile who loves to travel? Awesome! Make sure your next trip is soundtracked perfectly by checking out this guide on audiophile travel setups. It’s packed with tips for keeping your music quality high on the go. And speaking of travel prep, don’t forget insurance! Protecting your trip with a solid plan from Aon travel insurance is a must-have for peace of mind.
You’ll be able to relax and enjoy your tunes knowing you’re covered.
Types of Battery Management Strategies
Different battery management strategies aim to maximize battery life and minimize power consumption. One common strategy is to use the battery switch to completely disconnect the house batteries when the RV is not in use, preventing parasitic drain from small electronics. Another involves using the switch to power only essential systems when boondocking (off-grid camping), conserving battery power for more important functions like lighting and water pumping.
Some RVs utilize more sophisticated systems, such as battery monitors that track power usage and provide alerts when batteries are low. These advanced systems often integrate with the battery switch, offering granular control over power distribution.
Power Flow Diagram
Imagine a simple diagram. At the top, we have your house batteries (two 12V batteries connected in parallel, for example). From the batteries, a heavy-gauge wire leads to the battery switch. The switch itself acts like a multi-way selector, offering different positions: “Off,” “Battery,” “Both,” and “Shore.” In the “Battery” position, power flows directly from the batteries to a fuse box.
This fuse box protects various circuits supplying power to different parts of your RV (lights, water pump, etc.). In the “Shore” position, power from the shore power connection (30 or 50 amp) bypasses the batteries and goes directly to the fuse box. The “Both” position allows both battery and shore power to supply electricity, charging the batteries while also powering the RV.
The “Off” position completely isolates the batteries.
Maximizing Battery Life and Efficiency
Regularly inspecting your battery switch and connections is crucial. Corrosion can build up over time, hindering efficient power flow and potentially damaging your batteries. Using the “Off” position when not using your RV for extended periods prevents parasitic drain. When boondocking, selectively use the battery switch to prioritize essential systems, avoiding unnecessary power consumption. For example, turn off lights and appliances when not in use.
Finally, consider investing in a battery monitor to better track your power usage and make informed decisions about conserving energy.
Safety Precautions and Best Practices: Battery Switch On Travel Trailer Function
Working with batteries and electrical systems in your travel trailer requires caution. Improper handling can lead to serious injury, including burns, explosions, and electrical shock. Understanding and following safety procedures is paramount to protecting yourself and your equipment.Incorrect operation of the battery switch can result in several problems. For instance, accidentally connecting a discharged battery to a charged one can cause a significant current surge, potentially damaging both batteries.
Similarly, working on the electrical system with the switch improperly positioned can lead to unexpected shocks or short circuits. Taking appropriate safety measures mitigates these risks significantly.
Safety Equipment
Proper safety equipment is essential when working with your travel trailer’s electrical system. This isn’t just about avoiding injury; it’s about preventing costly damage to your equipment. Always wear safety glasses to protect your eyes from sparks or acid splashes. Insulated gloves are crucial to prevent electrical shocks, and closed-toe shoes will protect your feet from potential hazards.
A heavy-duty work mat will insulate you from the ground, providing extra protection from electrical currents. Finally, consider using a multimeter to check voltage levels before working on any components, ensuring everything is properly disconnected and safe.
Best Practices for Battery Switch Maintenance
Regular maintenance ensures your battery switch operates correctly and extends its lifespan. Inspect the switch and its connections regularly for corrosion, loose wires, or damage. Clean any corrosion using a wire brush and a battery terminal cleaner. Tighten all connections to ensure a secure and reliable electrical connection. Periodically, apply a dielectric grease to the terminals to prevent corrosion.
This will keep the connections clean and efficient, preventing voltage drops and potential problems. If you notice any signs of damage or malfunction, replace the switch immediately rather than risk potential safety issues or equipment damage.
Battery Switch and Different Power Sources (Shore Power, Generator)
Your travel trailer’s battery switch is the central control for managing power from various sources. Understanding its interaction with shore power and generator power is crucial for efficient and safe operation. This section details how these systems work together and potential problems you might encounter.The battery switch acts as a gatekeeper, controlling the flow of power from your trailer’s batteries to the 12-volt system.
However, it doesn’t directly control the 120-volt AC power from shore power or a generator. That’s handled by separate breakers and your converter. The battery switch is primarily for managing the DC power from your batteries, ensuring you can use them independently or in conjunction with other power sources.
Shore Power Interaction
When you’re plugged into shore power (a campsite’s electrical hookup), the primary power source for your 120-volt appliances is the external power. Your converter then transforms this AC power into 12-volt DC power to charge your batteries. The battery switch remains independent of this process, allowing you to use the batteries simultaneously or disconnect them entirely for maintenance or storage.
However, if your shore power fails, your battery switch enables you to seamlessly switch to battery power (provided your batteries have sufficient charge), keeping essential 12-volt systems operational.
Shore power provides 120V AC power, which is converted to 12V DC to charge the batteries and power 12V appliances. The battery switch does not directly control this flow of power.
Generator Interaction
A generator functions similarly to shore power. It produces 120-volt AC power that charges your batteries via the converter. The battery switch remains independent, offering the same control over your battery power as with shore power. If your generator malfunctions or runs out of fuel, you can switch to battery power using the battery switch, provided the batteries have enough charge.
Remember to safely shut off the generator before switching power sources to prevent backfeeding.
A generator provides 120V AC power, mirroring the function of shore power. The battery switch’s role remains consistent, providing control over battery power regardless of the AC source.
Switching Between Power Sources
Switching between shore power, generator power, and battery power usually doesn’t involve directly manipulating the battery switch itself for the 120V systems. The process is typically handled by unplugging one power source and connecting the other. The battery switch’s role is to manage the DC power flow from the batteries, allowing you to isolate them when not needed or use them as a backup power source when shore power or generator power fails.
Always ensure power is off at the source before making any connections or switching the battery switch.
Potential Issues When Switching Power Sources, Battery switch on travel trailer function
One potential issue is accidental backfeeding. If you connect a generator or shore power while the battery switch is in the “on” position, it can potentially damage the converter or other components. Another issue could be insufficient battery charge. Relying solely on battery power during extended periods without charging can lead to a complete power outage. Finally, incorrect switching can cause confusion about which power source is active, leading to potential electrical problems.
Typical Travel Trailer Electrical System
Battery Switch: This is the central control for your trailer’s 12-volt DC battery system. It allows you to disconnect the batteries completely or connect them to the trailer’s electrical system. Commonly a 3-position switch: OFF, Battery, and Both (Battery and Shore/Generator).
Shore Power Inlet: Located on the exterior of the trailer, this is where you plug in the 30-amp or 50-amp cord from a campsite’s electrical hookup. This provides 120V AC power to the trailer’s converter and appliances.
Generator Hookup: Similar to the shore power inlet, this connection point allows you to connect a portable generator to provide 120V AC power. It typically uses a similar sized cord as shore power.
Mastering your travel trailer’s battery switch is essential for a successful and safe RV adventure. By understanding its function, implementing safe practices, and knowing how to troubleshoot common problems, you’ll be well-equipped to handle any power situation. Remember to always prioritize safety when working with electrical systems, and consult a professional if you’re unsure about any aspect of your RV’s setup.
Happy travels!
Q&A
What happens if I leave my battery switch on all the time?
Leaving your battery switch on constantly can drain your batteries, even if you’re not using any appliances. It’s best to turn it off when not using the trailer for extended periods.
How often should I check my battery connections?
Check your battery connections before and after each trip. Look for corrosion and ensure they’re tight. Regular cleaning will extend battery life.
My battery switch is stuck. What should I do?
Try lubricating the switch mechanism with a suitable lubricant. If that doesn’t work, you may need to replace the switch. Consult a professional if you’re unsure.
Can I use a different type of battery in my travel trailer?
It’s best to use the type of battery recommended by your travel trailer manufacturer. Using an incompatible battery can damage your electrical system.
